Your cart is currently empty!
Blog
-
Version 1.9.1 and 1.9.2
I forgot to make a post for 1.9.1 so this one is a twofer.
### Fix - Waypoints layer was sometimes not assigned and caused error - Drawing a northing line across zones would render incorrectly### Added - Pilot Rings toggle button - Setting for show/hide of icon labels - Highlight the waypoint being navigated to - Custom numpad button sizing ### Changed - Readouts don't take up so much space ### Fixed - Save numpad position - Fixed bug with rendering rings if blank ring was given -
Version 1.9.0
The big changes: Multi Waypoint Tracking, Numpad, and Heading Hold Line.
## 1.9.1

### Fix

- Waypoints layer was sometimes not assigned and caused error
- Drawing a northing line across zones would render incorrectly

## 1.9.0

### Added

- Rulers show labels for all locked segments.
- Rulers show circles at vertices in edit mode.
- Color picker for waypoints.
- Custom colors for pilot rings.
- Multi Waypoint tracking.
- Custom default ruler color.
- Custom default waypoint color.
- Button for getting magnetic variation is now active, will use GPS or center of screen as fallback.
- Button for hiding/showing layers panel
- Numpad for easier entering of numbers
  - Applied to Waypoint Editor, Wind Lines, Polygon Tool, Lines Tool, Time Distance Speed Calculator
- Heading Hold Line option added to Flight Winds.
- Default ring sizes.

### Changed

- Added additional decimal point to "to/from/heading/bearing" values for additional precision.
- Renamed "Ruler" to "Plotter".
- Trying some different default styling with waypoints. They are now sized to 50m. So zoomed out they will be small(but still clickable). With the added default rings hopefully this can allow for a more precise bearing line to a target.

### Fix

- Pilot rings render correctly.
- Readouts update when waypoint is moved.
- Snapped lines draw across point more accurately.
- Fixed bug with rendering rings if blank ring was given.
- Waypoints created by 4x4 check for adjacent zones correctly.
Multi Waypoint Tracking
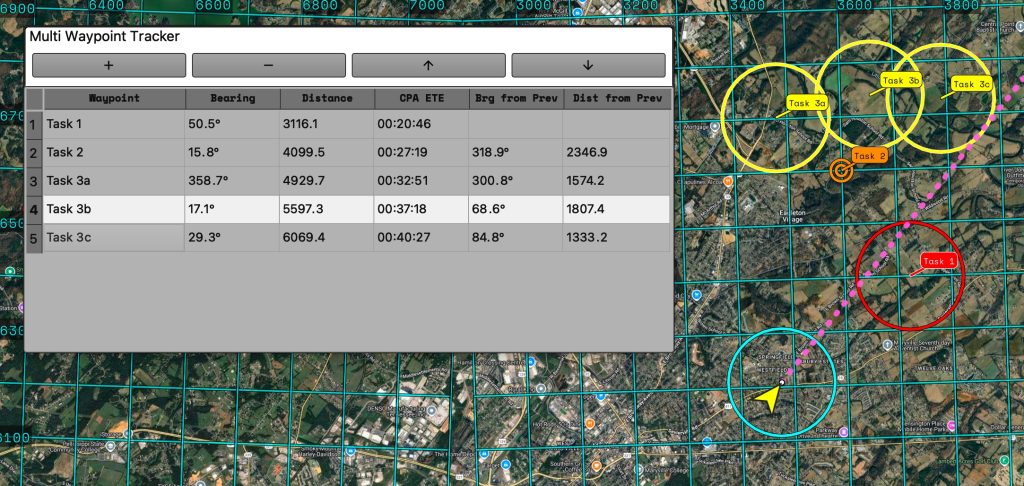
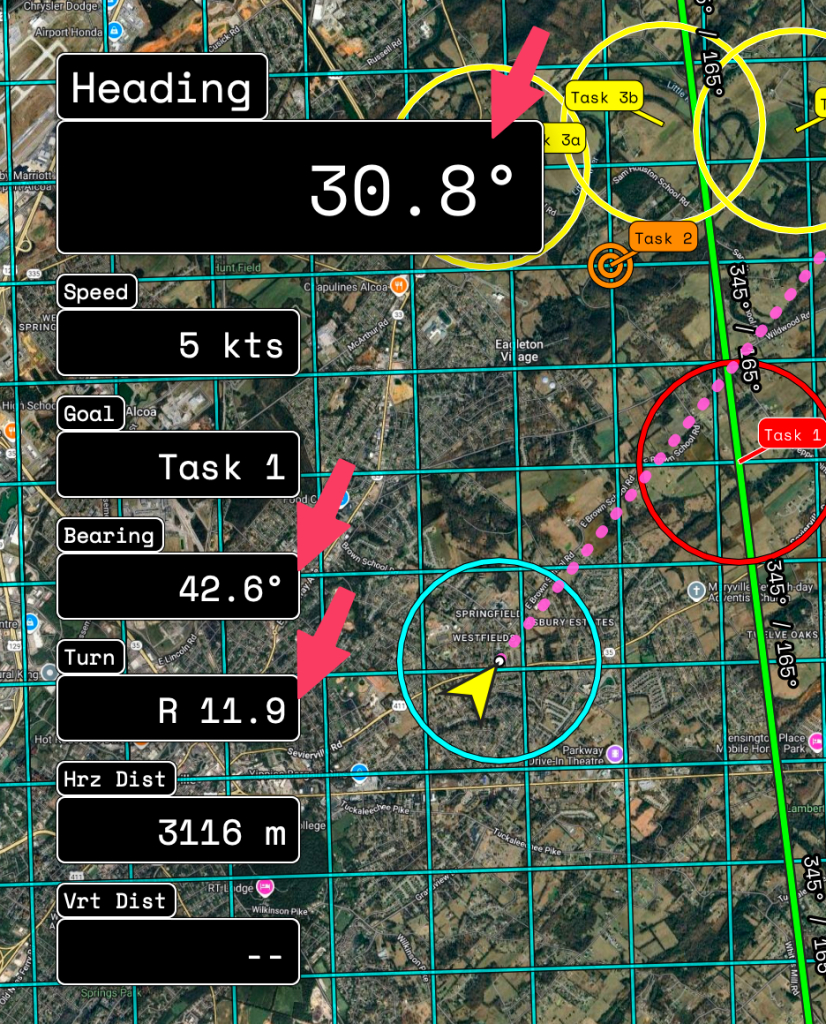
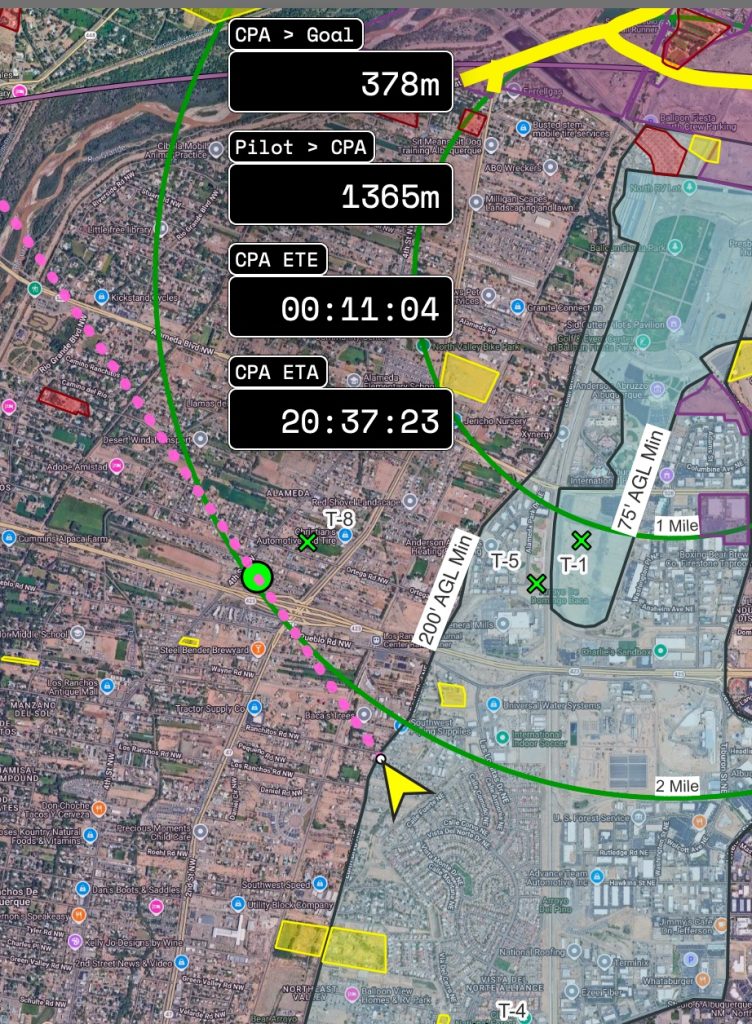
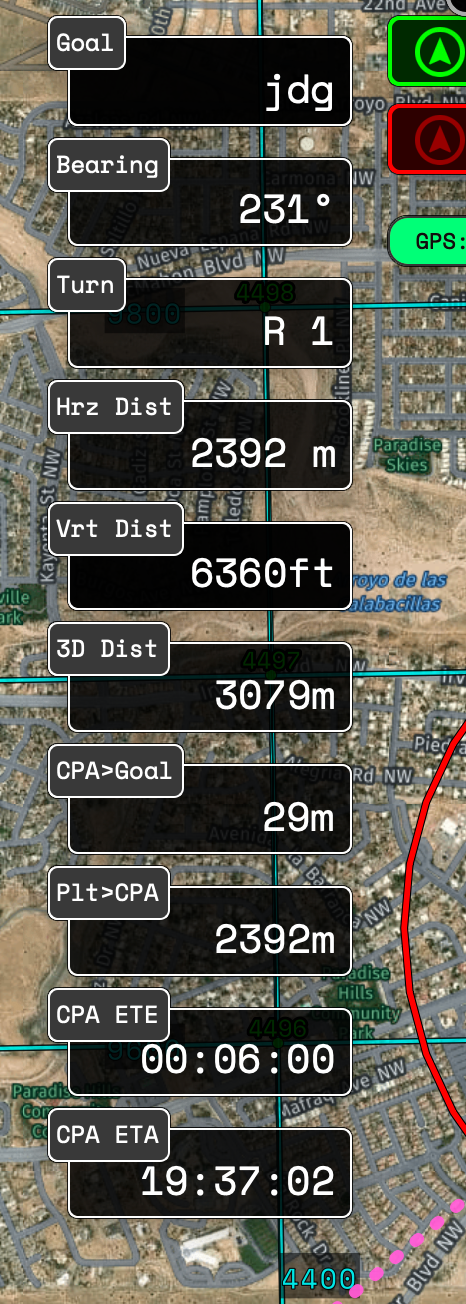
Press the “+” button to start adding waypoints. It will stay in “add mode” until you press the “+” button again. The added waypoints will now show their bearing and distance from your current position. It will also show an estimated time to arrive at the waypoint based on your current speed.
When navigating to a target after after your current target the dialog will show the bearing and distance from the previous point in the list.
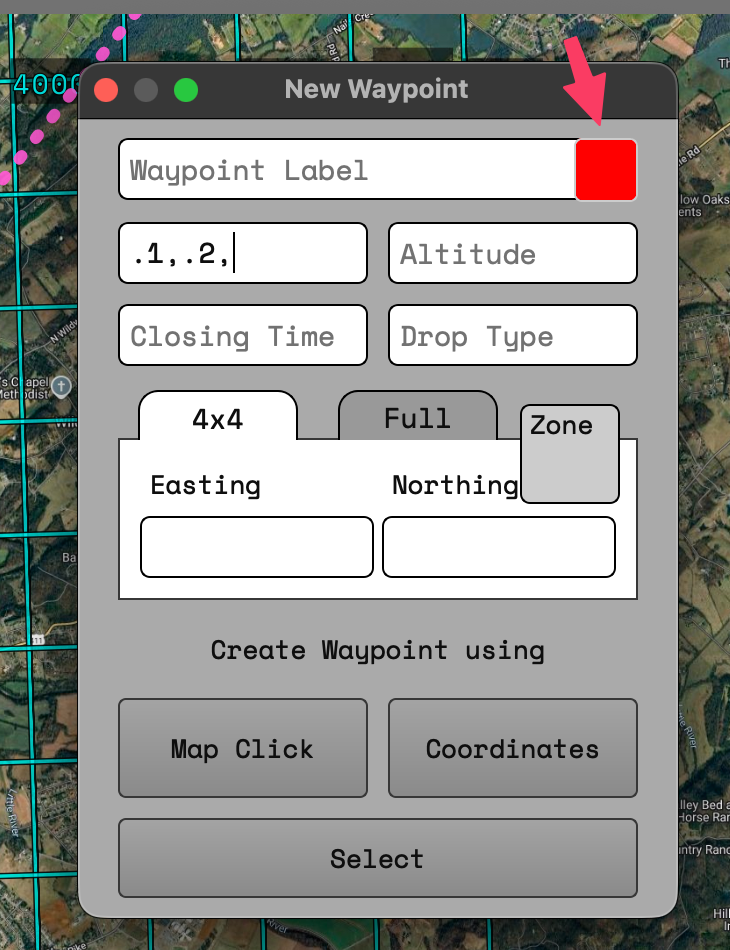
Number Pad
When the num pad is not showing the default keyboard behavior will occur. If you open the num pad it will block that behavior for fields marked to use the number pad.
Fields that are meant to have alphanumeric characters will NOT accept input from the num pad.
Only fields intended to have number values will utilize the number pad. The field will highlight and the selected input label will be shown on the numpad. PRESSING BUTTONS ON THE KEYBOARD WILL BE BLOCKED ON THAT FIELD WHILE THE NUMPAD IS SHOWN. Closing the numpad dialog will allow normal keyboard behavior.
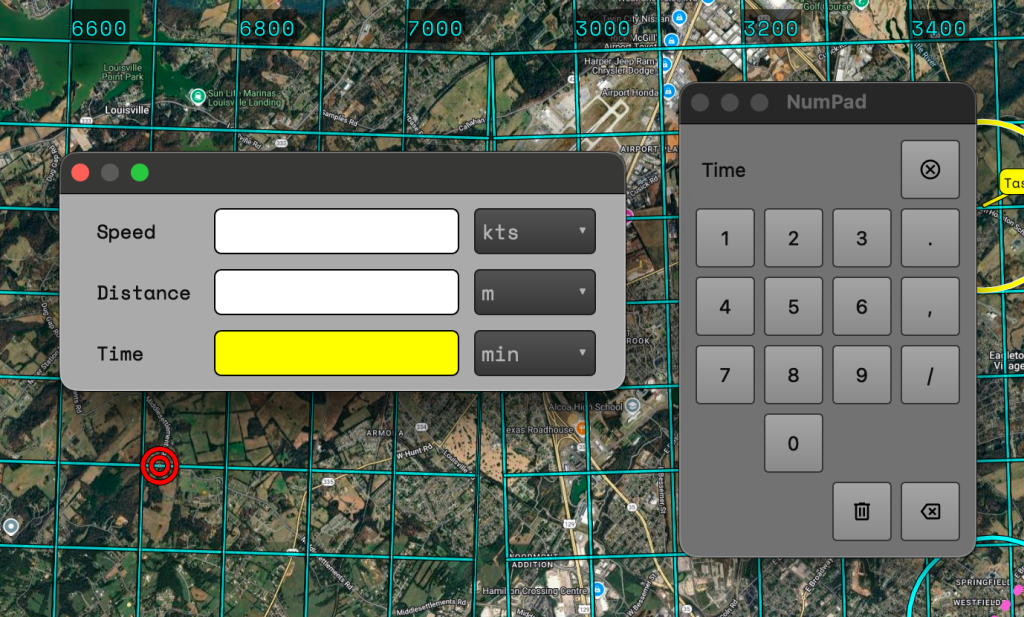

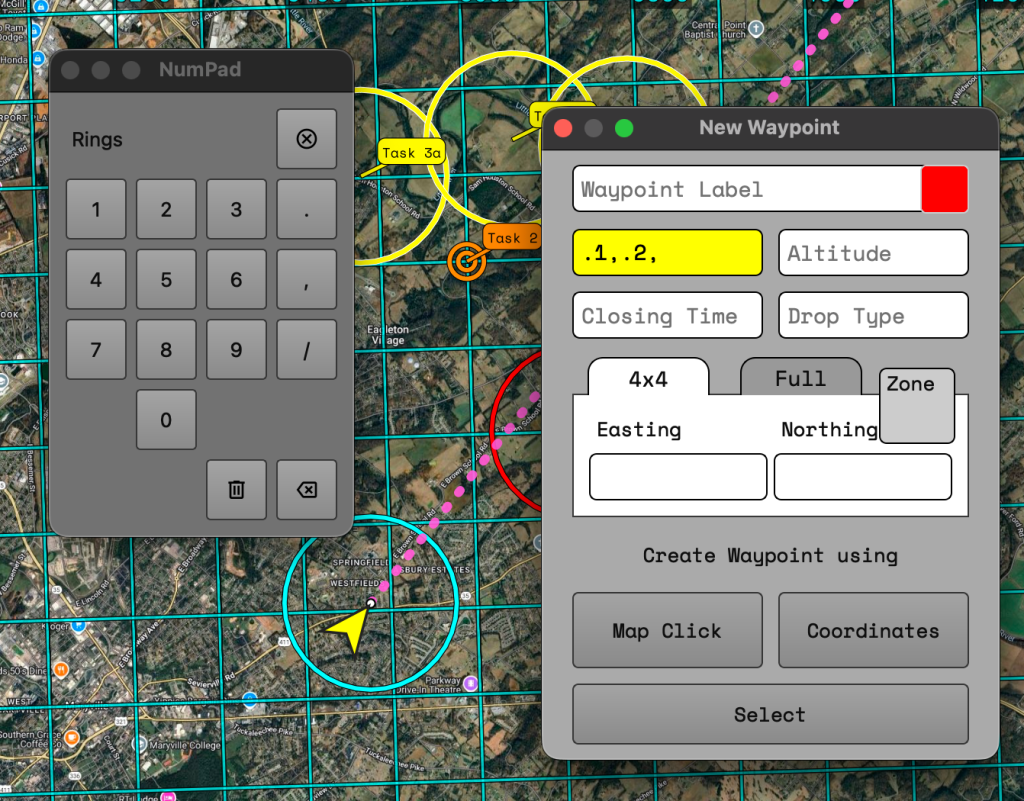
On the bottom row of the numpad there are two buttons. One has a trashcan icon and one has an ‘X’ inside an arrow.
- The trashcan button will clear the contents of the selected field.
- The arrow with the X acts as a backspace.
On the top row all the way to the right is a button with an X inside a circle. This button will close the numpad.
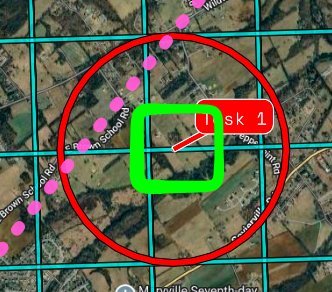
Heading Hold Line
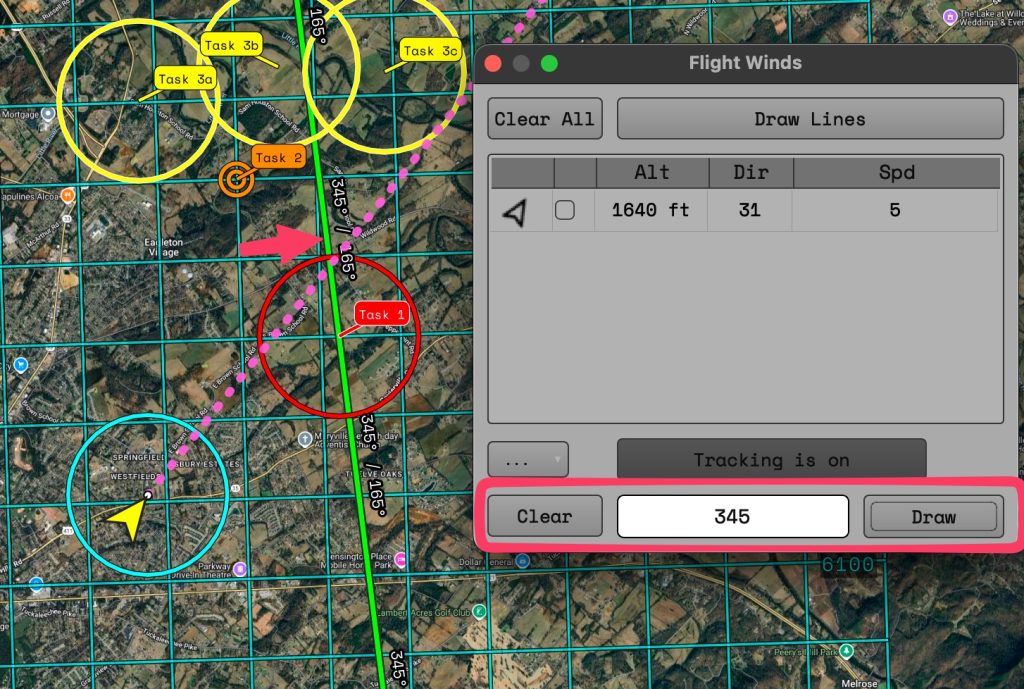
Useful when approaching a target and quickly placing winds provided by crew. Enter a value into the input field, click the “Draw” button, and then click on the map. This will draw the line at the location clicked. If you click near a waypoint the line will be centered over the waypoint.
Additional Changes
Added a button to quickly show/hide the layers panel.

Added a color picker to the waypoint editor.
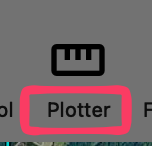
Changed the label of the “Rulers” button to “Plotter”. This better matches the intended use for the tool.
Added the decimal points for appropriate values for MOAR PRECISION.
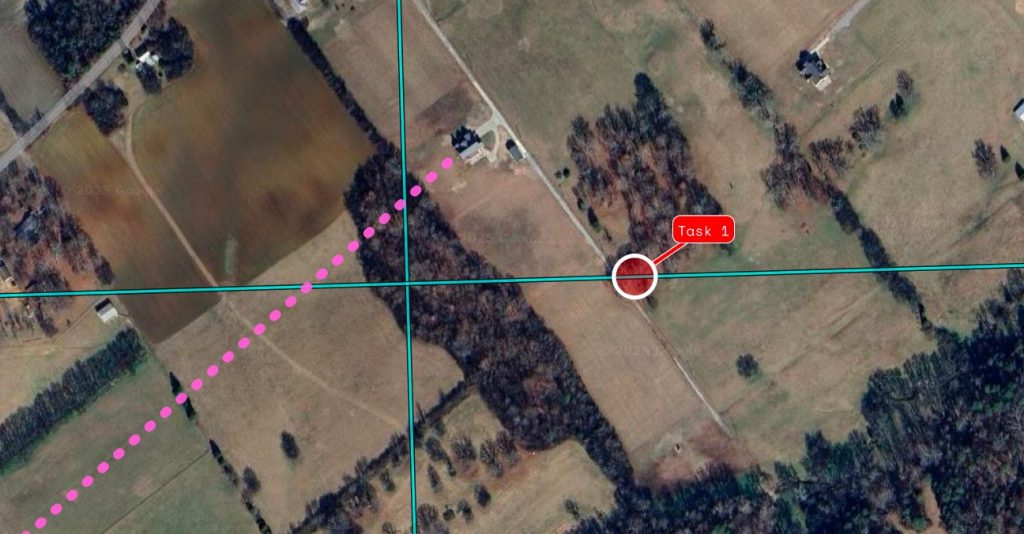
Speaking of precision. The styling for waypoints has been changed to better show their position when zoomed out. Instead of always being the same size circle the waypoint will now render as a 50m circle. Now if your bearing line is off your desired line it will be easier to see. But don’t worry clicking the waypoints for navigating or editing is still easy with our patent pending(not really) Easy Selection Technology.

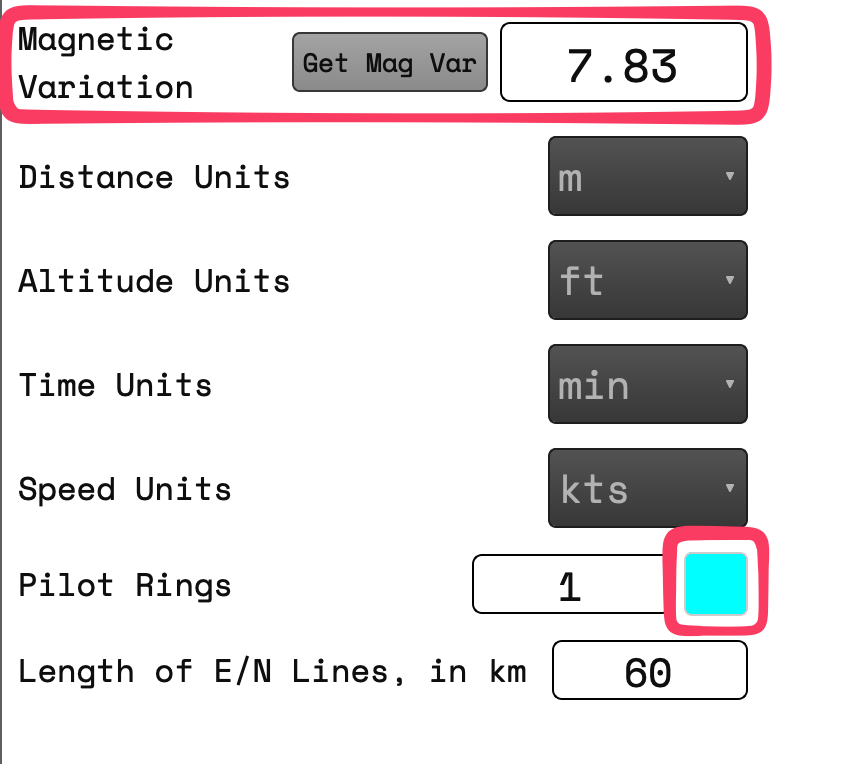
New changes in settings!
The magnetic variation button is now fully operational. If you have turned on the GPS for LtaGo! your location will be used for determining the magnetic variation. It is important to note that this will include altitude which can affect the result considerably. If GPS is off the coordinates of the center from the current map view will be used with an altitude of ZERO.
Pilot ring colors can now be set.
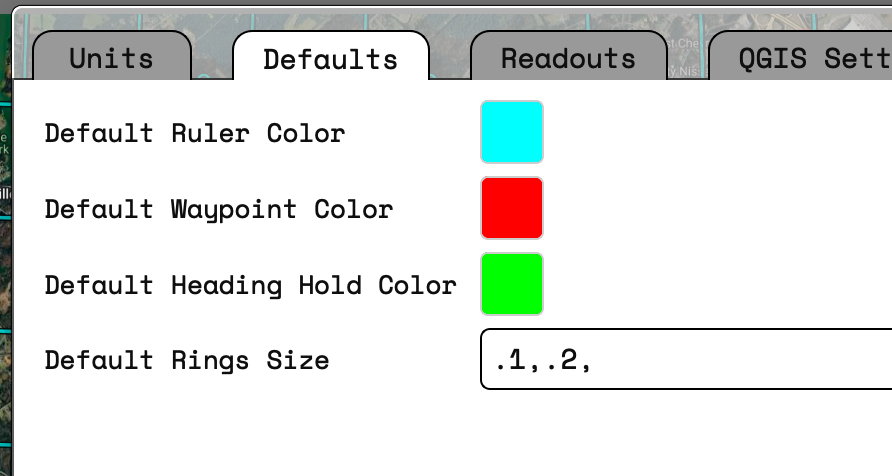
An additional tab for default values has been added. The colors will change the default used colors for the tool in the label, Ruler, Waypoints, Heading Hold. The default rings size will allow you to automatically add a set of rings to all new waypoints you create. These will still be removable or editable on waypoints during creation .
-
Version 1.8.0
The Ruler update!
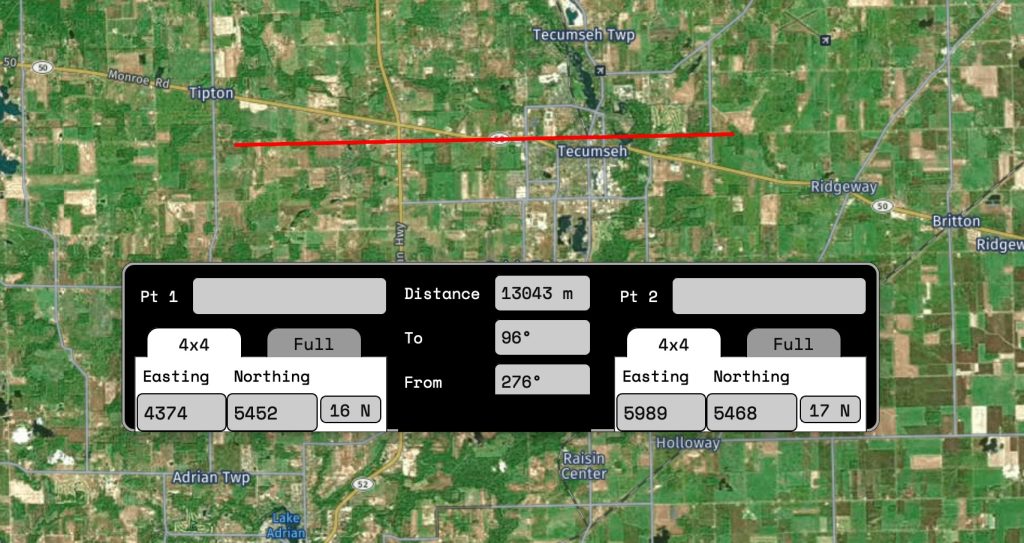
The ruler has received some significant, and much needed, updates. You can now add multiple rulers AND you can add multiple segments to those rulers. A ruler with multiple segments will provide an angle between the segments. When moving a ruler point if you release the point near a waypoint it will “snap” to that points coordinates.
Rulers will show “To”, “From”, “Distance”, “Angle”(if multiple segments), and a custom color.
## 1.8.1

### Fix

- Update position of both new and edit waypoint dialogs when either is moved
- Fix vertical distance calculations
- Changed some font sizes for labels on windlines and waypoints
- Ruler was not using magnetic deviation
- Rulers disappeared if another map tool is selected
- Magnetic deviation didn't allow negative numbers

## 1.8.0

### Added

- New Rulers Dialog added.
- Multiple Rulers can be added.
- Rulers can have multiple segments.
- Ruler ends will snap to closeby waypoints.
- Rulers save to dedicated ruler layer
- Added text under toolbar icons.

### Fix

- Flight winds show correctly
- Wind Lines save between restarts
How it works
The most simple example is creating a single ruler. First click the “Locked” button to unlock the ruler editing.

Click the “+” button and then will add a new ruler using the default color set via the settings.
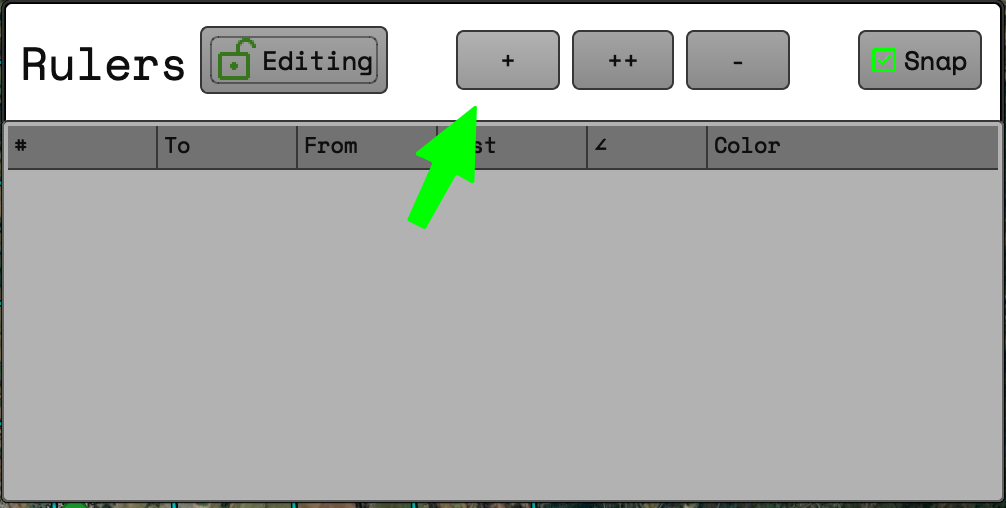
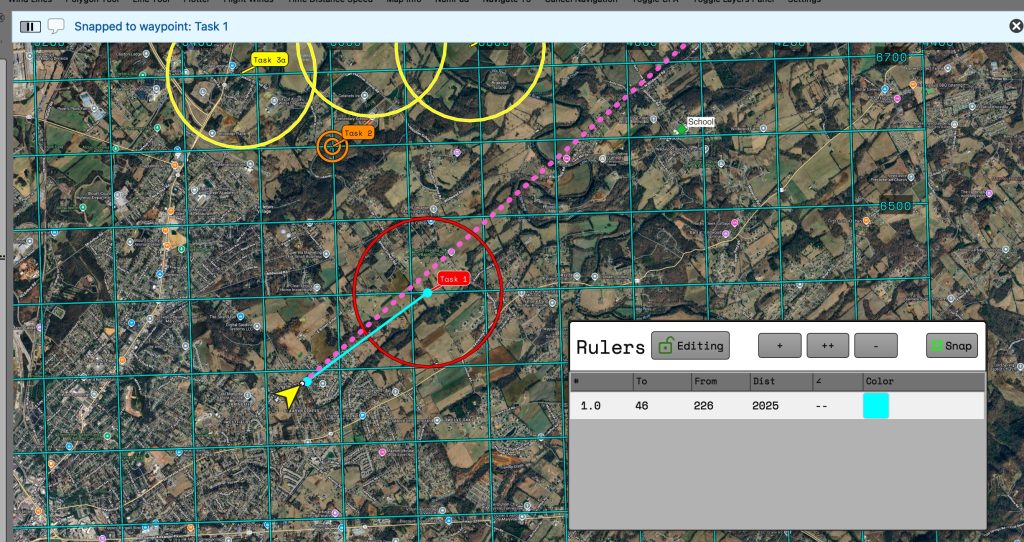
Once the ruler is added you can grab either end to reposition it. When the “snap” button is checked and releasing the point near a waypoint will “snap” the ruler point to match the coordinates of the waypoint. If the “snap” button is unchecked then the ruler point will stay wherever the cursor is released.
Clicking on the color square will allow any color to be selected for the ruler.
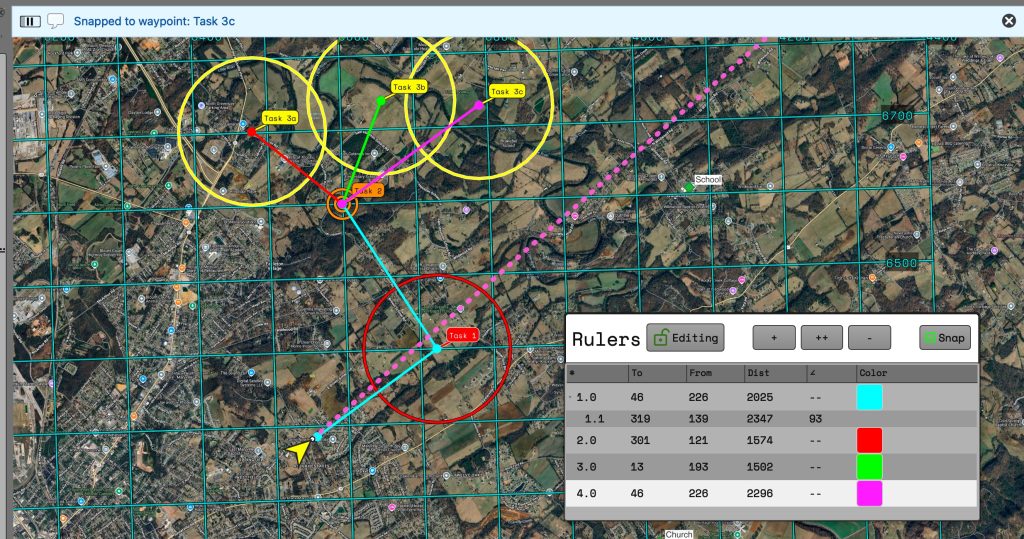
Clicking on the “+” button will add an additional ruler to be positioned independently of other rulers.
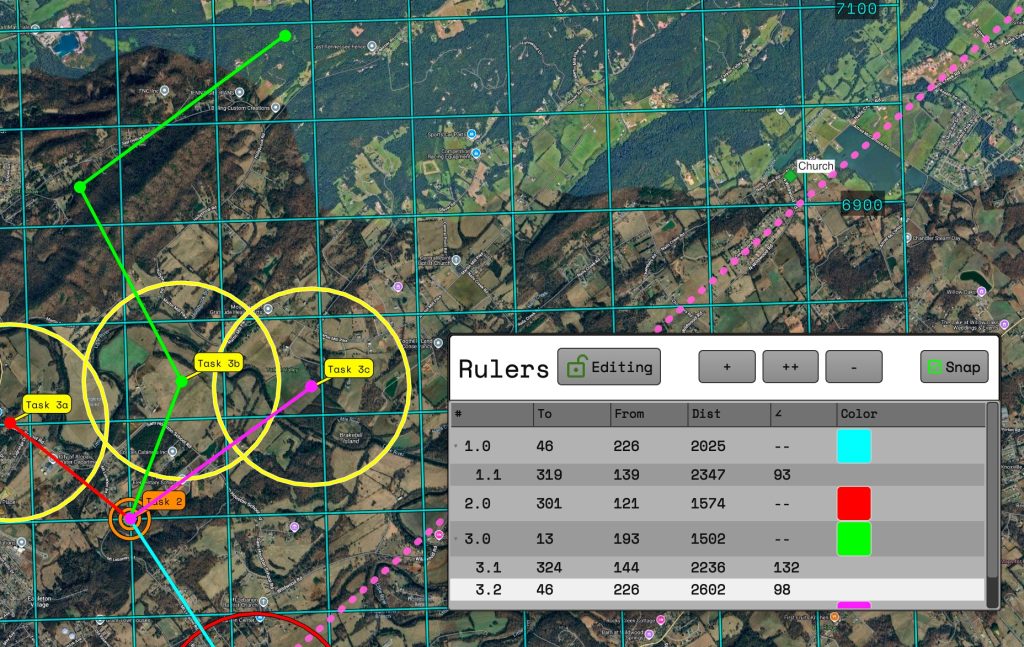
Clicking on the “++” will append an additional point to the selected ruler. This will add the calculated angled of the 3 points. Additional added points will calculate the angle between subsequent sets of points.
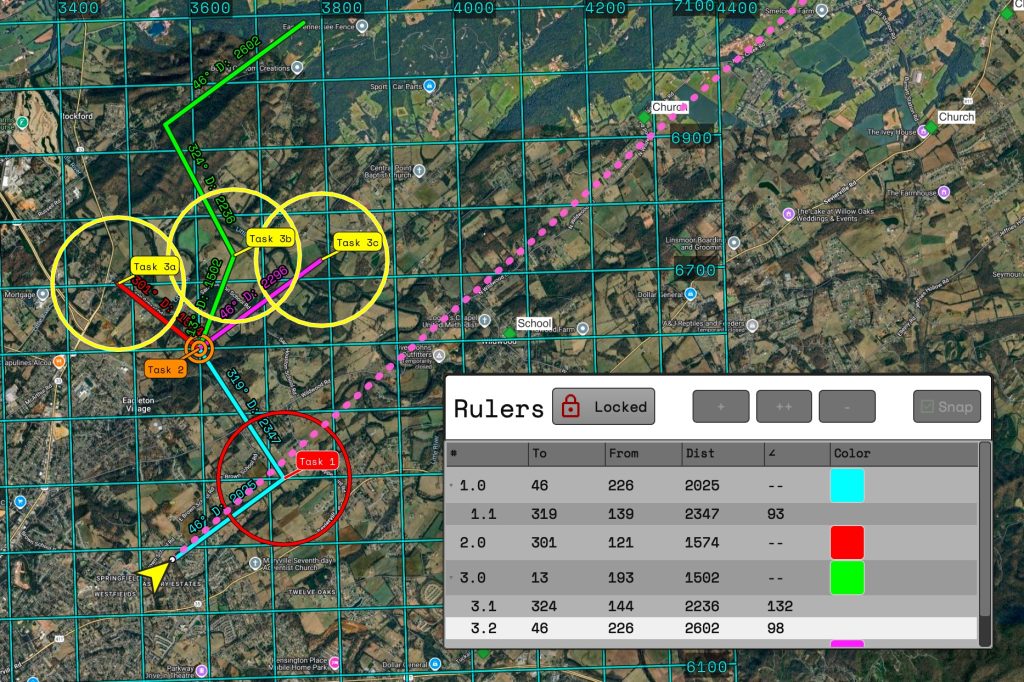
When the ruler dialog is closed the editing mode will be switched to locked or the editing button can be clicked to lock the rulers in place. You can click the button again to edit any rulers.
When locked the rulers will be labelled so the distance and direction information is still available while the dialog is closed.
-
Version 1.7.0
Nothing huge on the front side here, but I made some changes under the hood that could cause some funkiness from previous versions so I bumped the minor update.
1.7.0
Added
- Naming of readout groups
- Double click a readout group to collapse/expand it
Demo
-
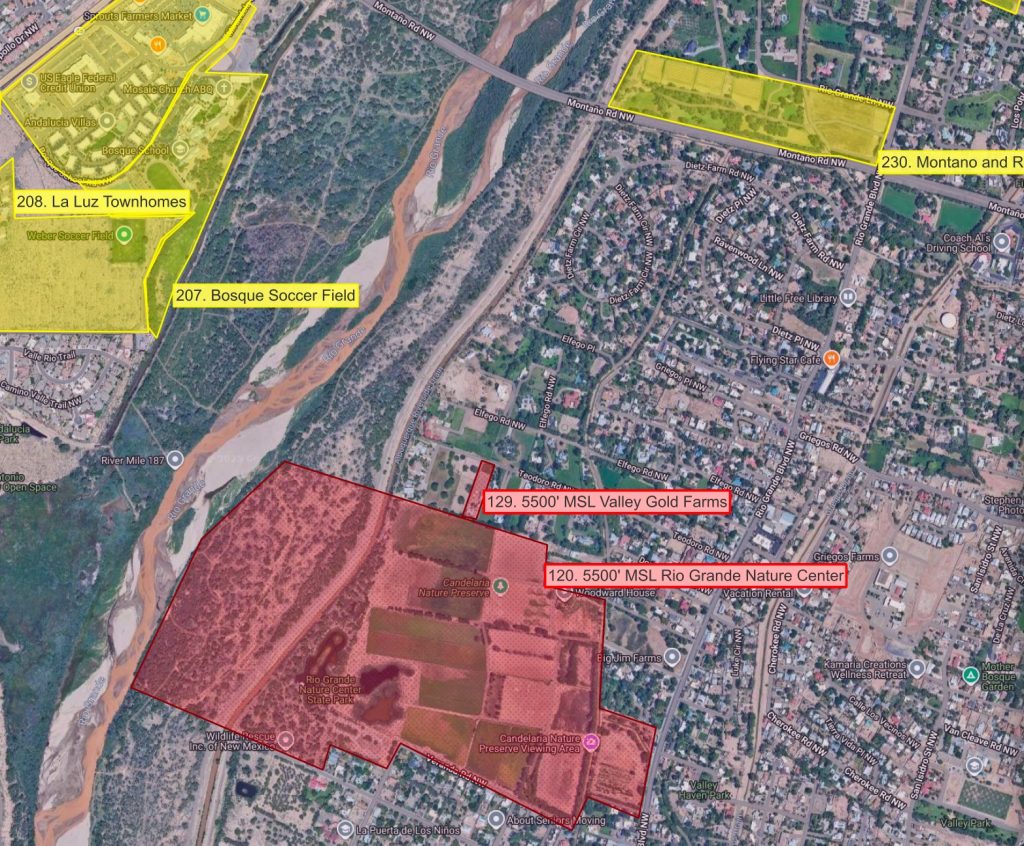
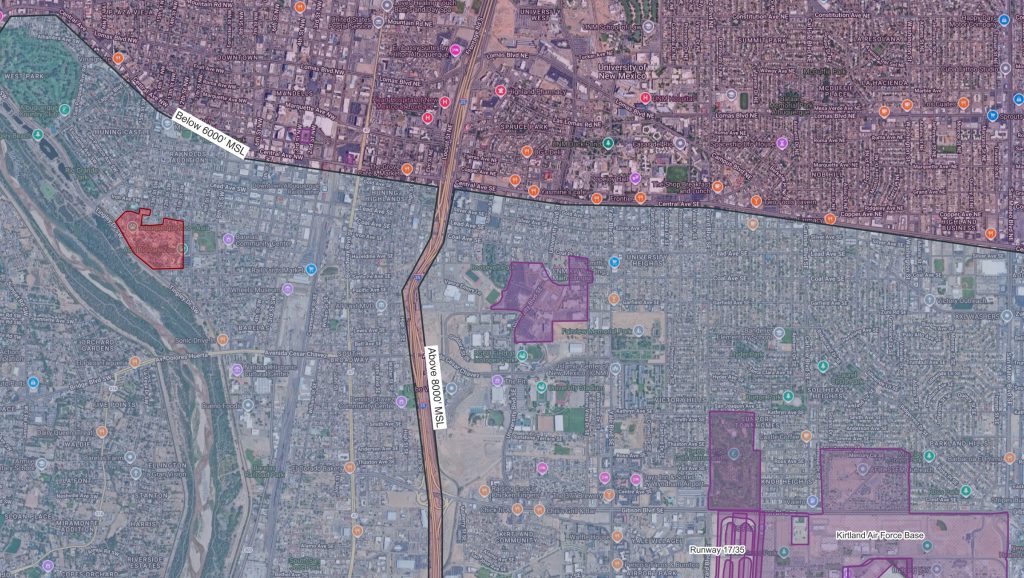
Map for 2025 Fiesta
Everything should be plug and fly. Unzip the files and then you can drag them into your own project or open the project in the zip file titled “2025 Fiesta.qgz”.
Download the files at the link below.
I’ve labelled and colored everything in ways I hope makes sense.
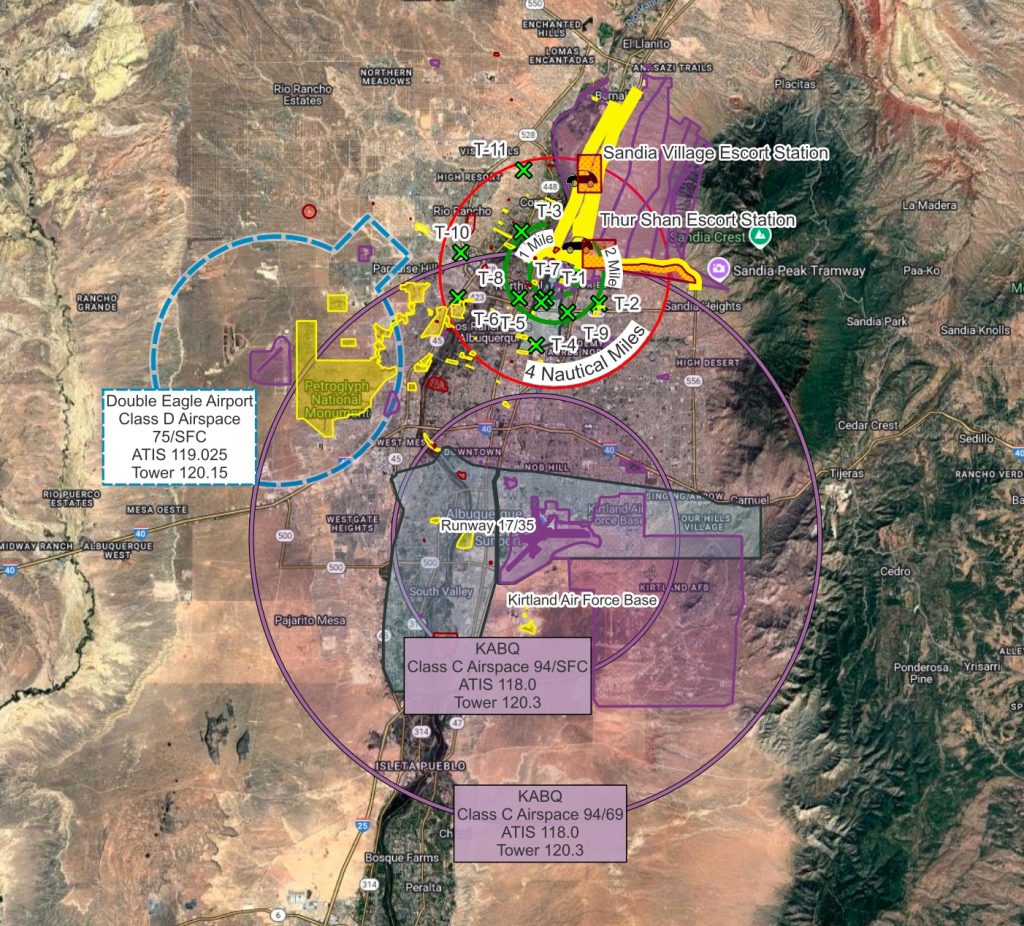
To view details on PZs such as altitude when you zoom in the labels will appear. This will avoid clutter when zoomed out.
-
Version 1.6.0
We’ve skipped a few versions that I didn’t end up fully releasing so now we have jumped to 1.6.0.
The big changes coming out with 1.6.0 are new readouts and readouts customization and a new set of tools for choosing waypoints for navigation.
There is also a change on how you can download/update coming out along with this version, but that has it’s own post that you can read here.
1.6.0 Changelog
- Added Settings menu for readout groups
- Readouts can be customized with size, position, colors
- Altitude, heading, speed update with GPS
- Smart waypoint select
- Can select waypoint from any “point” layer
- Create waypoint and start navigation if no close by waypoints
- Changed how CPA point is rendered on the map
- Create custom groups of readouts
Fix
- Initial value for magnetic variation is now a string
- Only reset LtaGoLayers
Custom Readouts
Readouts are now much more customizable. You can create separate groups, and positions, change size and colors. The individual groups can be position independently from each other. All readouts will show or hide when selecting the readouts button.
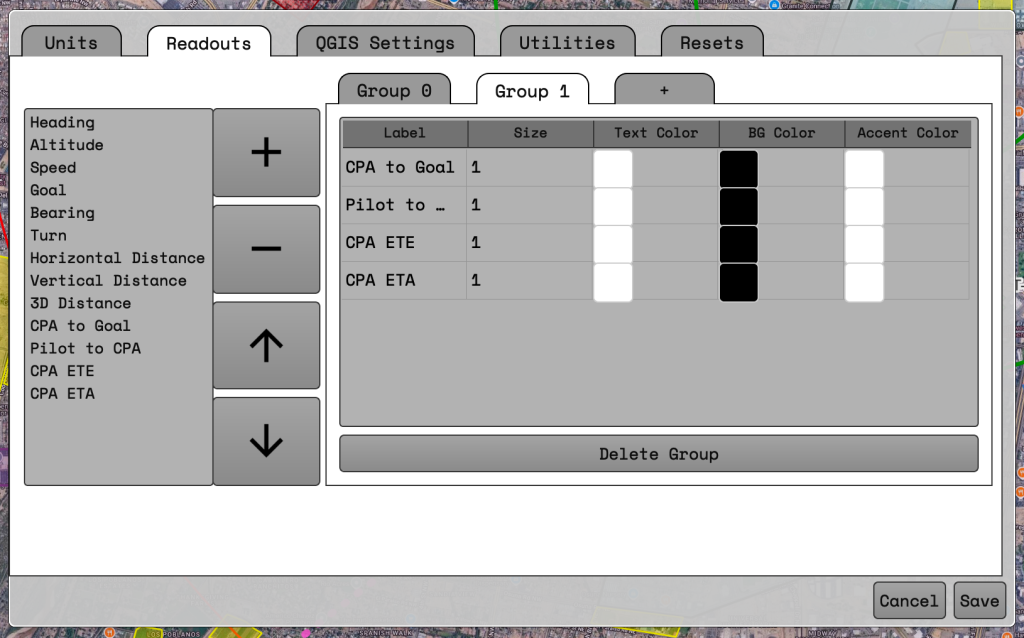
Readouts can be modified by going into the settings window. At least one group should always be present.
Creating a new group with readouts
- To create a new group click on the tab showing a ‘+’. The group will be empty by default.
- Select a readout on the list on the left of the window.
- Click the large ‘+’ button in the middle. This will add the readout into the group table on the right hand side.
- Repeat steps 2 and 3 for all desired readouts.
Deleting a group of readouts
- Change to whichever group you would like to delete by selecting the tab along the top of the right hand box.
- At the button of the box click the ‘Delete Group’ button.
- The group will be deleted.
Reordering a readout
- Select a readout on the right hand side.
- Press the up or down arrows in the middle
- Readout should move in whatever direction was clicked.
Deleting a readout
- Select a readout on the right hand side.
- Press the ‘-‘ button in the middle.
- Readout will be removed from the group.
Changing the size of a readout
- Select the number in the size column of the row you want to change.
- Sizing is relative. ‘1’ is the default sizing. ‘2’ will double the size.
- Decimals can be used. ‘1.5’ or ‘0.5’ are valid entries.
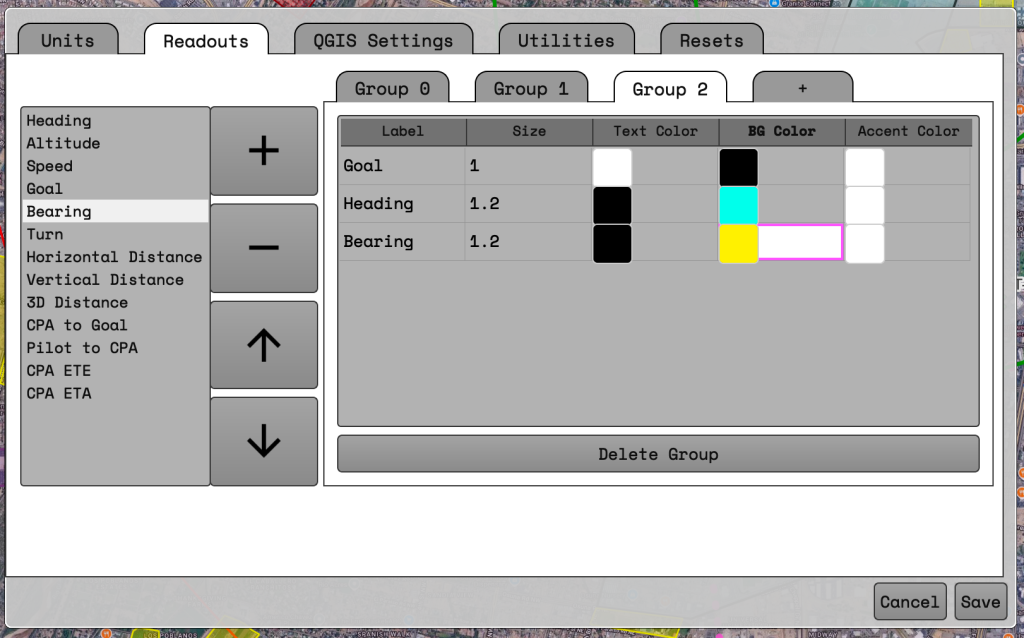
Changing the color of the readout
- The colors that can currently be changed are text color, background color, and border color.
- To change a color click on the colored square under the appropriate column.
- A color selection window should appear.
- Choose whichever color you would like.
When you are done changing the readout settings make sure to press the “Save” button on the Settings window.
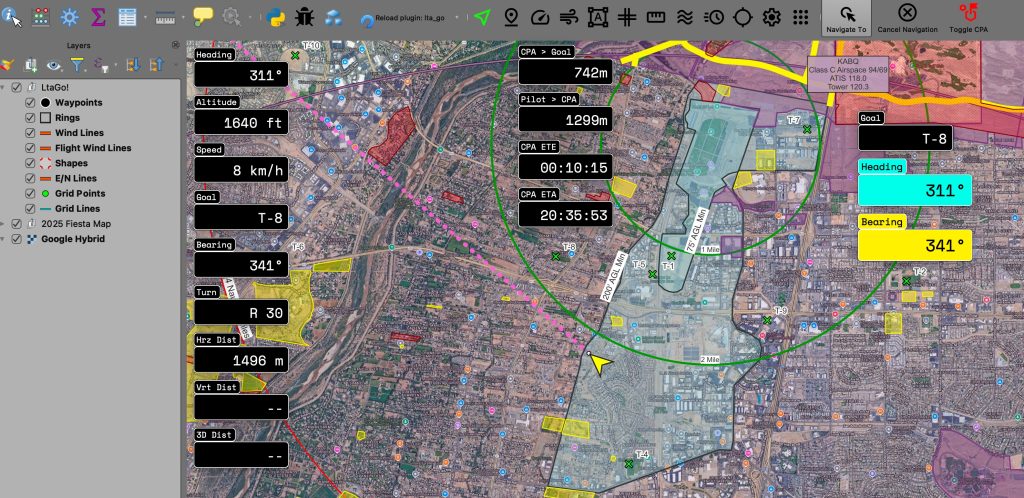
Waypoint Navigation
A new toolbar has been added for navigation. This allows for you to start navigation to a new location, cancel navigation, and toggle the Closest Point of Approach waypoint visibility.
The grid button below will show/hide the toolbar. If you want to move the toolbar you can click and drag the toolbar using the little line to the left of the ‘Navigate To’ button.
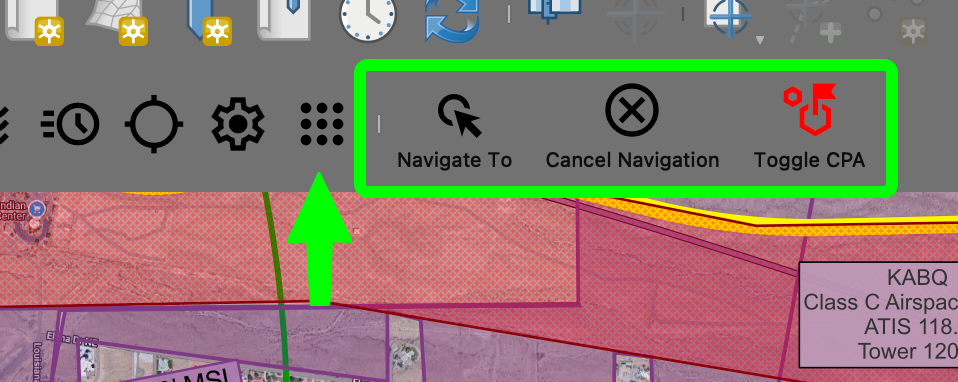
Navigate To button
The “Navigate To” functionality has had some under the hood changes and a couple functional changes to how you can use it. The first big change is it will now use all visible layers to select a point for navigation. If the selected waypoint has a “label” or “name” attribute that will be used for the goal name, otherwise the 4/4 will be used.
Under the hood selection of a waypoint should be a little easier as it will search for an available waypoint within a distance of the clicked point. This should help while flying and not having to click exactly where the point is.
If a waypoint is not found close to the clicked point a waypoint will be created and navigation started. The 4/4 will be shown for the goal name if needed for any goal declarations.
Toggle CPA button
The toggle CPA will show or hide the Closest Point of Approach to your currently selected goal. This only affects the rendering of the waypoint on the map. All other CPA calculations will still show on the readouts. Hiding the CPA should hopefully be a band-aid for any flashing of waypoint labels .
-
Version 1.2.3
Features
- Added a “Reset Everything” button in settings. Should be used after installing an update to clean things out and make sure some under the hood updates have occurred on the layers.
Bug Fixes
- Corrected miscalculation with not going to the right point with the shape editor when crossing a 0000/xxxx or xxxx/0000 line.
- Corrected grid not generating across zone boundaries sometimes.
-
Version 1.2.2
Bug Fixes
- Fixed error when not setting an altitude on a waypoint(Thank you Grant!)
-
Version 1.2.1
New or Updated features
- Vertical distance to goal
- 3D distance to goal
- Allow both an Easting and Northing value for an E/N Line
- E/N Lines handle crossing zones properly
- Added setting for E/N lines length
- Pilot Rings should be drawn a little bit more efficiently
Bug fixes
- Corrected miscalculation when generating a point from 4×4 when close to a 0000 crossover
- Fixed issue where shapes were not being deleted correctly and overwriting each other
-
Version 1.1.0
- Updated look and feel of navigation tool
- Added zone numbers and hemisphere to coordinates
- Ruler tool
- Changed readout look and feel for ruler information
- Added coordinates for both points of the ruler
Screenshot - Fixed bug with E/N lines not finding the correct coordinates
- Fixed error when navigation started without a GPS connection
- Corrected grid being created across different zones

Screenshot